 Using embroidery floss for doll hair gives your plushie a very natural, realistic feel to it. This is especially great if you can combine colors.
Here’s a tutorial on how to use embroidery floss (and yarns) and how to attach it.
Materials:
• Scissors
• Embroidery thread spool. You can either chose getting:
o 1 solid color
o 2 colors. You can try a darker/lighter shade, or an initial color with a highlight color. The example we use is an initial color plus highlight combination.
• An open, unfinished seam you want to put the yarn in.
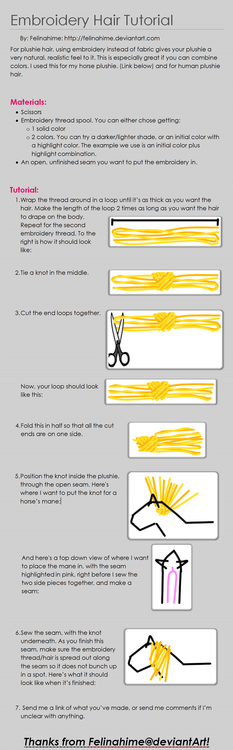
Tutorial:
1. Wrap the thread around in a loop until it’s as thick as you want the hair. Make the length of the loop 2 times as long as you want the hair to drape on the body. Repeat for the second embroidery thread. The image shows what it is supposed to look like.
2. Tie a knot in the middle.
3. Cut the end loops together.
4. Fold this in half so that all the cut ends are on one side.
5. Position the knot inside the plushie, through the open seam.
6. Sew the seam, with the knot underneath. As you finish this seam, make sure the embroidery thread/hair is spread out along the seam so it does not bunch up in a spot.
7. Send me a link of what you’ve made, or send me comments if I’m unclear with anything.
———————————————————-
Tools Used in making the tutorial itself: Word, Paint.net, and the snipping tool on Windows 7


